Explorer Box DIY – by Compact Camping Concepts
Don’t worry if you’re not a DIYer, Compact Camping Concepts has pre-made options to take care of your camping needs!
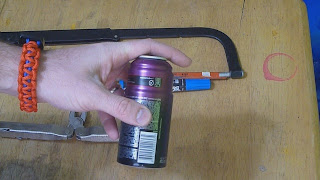
Axe deoderant backpacking alcohol stove
I was staring at an empty AXE deodorant container and wondering what to do with it. Will it be a mug? No, I don’t like drinking from boiling hot aluminum cups. What else can it be? a stove. My apologies to all of my readers who have seen too many articles on stove making. It’s probably a mix of my fire-loving, DIY doing and recycle-mindedness that motivates me. Oh… and you can throw in a bit of money saving as well.
I don’t recommend you go out and by something just to make a stove, but we all have habits and customs and at the end of the week/month we have empty aluminum and metal cans that we can recycle. If you use AXE deodorant this could be for you. The graduated diameter of the can makes it perfect for a double walled stove.
What you’ll need:
- Hack-saw or other metal cutting blade,
- permanent marker for marking cut and drill lines,
- 3 books to use to mark lines around the diameter,
- Drill and small drill bit (better of smaller than 1/8th”)
- pliers
- sand paper or file to smooth out cuts and drill holes.
- Discharge all remaining propellant from the can.
- Remove the top seal with pliers.
- Mark a line, all around the diameter at 6.5 cm form the bottom.
- Using the hack-saw, saw 90% through the surface of the can, rotating the can as you go.
- Finish cutting through the can with hack saw
- Once you get half way through the can, it should be possible to “open” the can by applying pressure to the seam.
- About 1 cm from the top of the bottom half, draw another line around the diameter.
- Spaced about 1.5 cm apart, draw marks along the line made in step 6.
- Drill through the outer can at the marked spots along the line.
- Clean up the cuts and drill marks using a file or sand paper.
- Invert the top half of the can and place it inside the bottom half.
- On a flat surface, press the two cans together until they slide into each otherand a seal is formed.
- Lock and load!
What should you put in your survival kit?
- Matches (waterproof)
- Candle
- Flint
- Magnifying glass
- Needles and thread
- Fish hooks and line
- Compass (button)
- Beta light (tritium illumination)
- Snare wire
- Flexible saw (chain saw)
- Medical kit – Analgesic, immodium, antibiotic, antihistamine, water purification, anti-malaria, potassium permanganate
- Surgical blades (for scalpels)
- Butterfly sutures
- Plasters (band-aids)
- Condom (for water storage – holds up to 1 liter)
- Mess tin (cooking utensil)
- Fuel (solid fuel tablets)
- Flashlight (pencil style)
- Flares (signaling)
- Marker Panel (fluorescent 0.3×2 meters for signalling)
- Matches (in a waterproof container)
- Brew Kit (tea, milk and sugar)
- Food (high in fat, long lasting, with salt)
- Survival bag (large plastic/polythene bag)
- Log book
- Tin for boiling water in which goes:
- garbage bag
- snare wire
- saw
- candle
- rope / cordage
- flare
- whistle
- razor blade
- mirror
- nails / pins
- lures / line (for fishing)
- fire starting
- compass
- flashlight
- tablets (medicine)
- repellant (bugs)
- repair kit
- laces
- 1 gallon zipper-lock bag
- Tincture of iodine (disinfecting water)
- Plastic drinking tube (3 feet)
- 2 condoms (canteens)
- Orange flagging tape
- Dental floss (100 feet)
- Duct tape (3 feet)
- Mini flashlight w/ spare bulb
- Extra flashlight batteries
- Magnesium block with striking insert
- Cigarette lighter
- Strike-anywhere matches dipped in paraffin
- Firestarters – cotton balls saturated with petroleum jelly
- Magnifying glass (signalling and fire starting)
- Glass signal mirror with sighting hole
- whistle
- Light space blanket
- Heavy duty space blanket
- 3 heavy duty plastic bags (type used for gathering leaves)
- Paracord (50 feet)
- Extra knife (fixed blade, high carbon steel)
- Bandana (brightly colored)
- Basic first-aid kit (wound dressing, moleskin, antibiotic ointment, and more)
- Topographical map and compass
DIY: Make that sleeping bag lighter
A few days ago I tried to make a brief case for backpacking quilts. The idea is this: any insulation that you lie on doesn’t insulate very well. If it doesn’t insulate it’s wasted space and weight in your pack. Of course if you wiggle around in your sleep you’ll need to have that insulation, in case you roll over. If not, I’ve got a cool project.
bag with all seams removed on the bottom |
I picked up a sleeping bag using points collected from a store that although a “technical” bag, was a bit bulky for my tastes. It’s a 0 C (32 f) bag, but because it uses cheaper hollow fiber insulation it is heavy. Over 3 lbs. I decided to use it as a practice project on saving weight by removing all insulation on the bottom of the bag and replace it with a pocket for a custom cut closed cell foam pad. My future plan is to take a down bag and shift all the bottom insulation to the top to not save weight, but make it warmer.
I cut right above the shoulders to be able to slip the pad in. |
In the end, I cut off 5 ounces from the bag and 1 ounce from the sleeping pad. This was in a bag that already only had half the insulation on the bottom (as a technical bag, the maker understood the waste of insulation on the bottom.) In a normal bag you could probably save double that.
My suggestion is to start by weighing the bag and pad and measuring how large it is in a compression sack so you can tell how much you saved.
Here’s what I needed to do that:
- sleeping bag (mummy)
- closed cell foam pad.
- scissors – to cut open the bottom of the bag to get access to the insulation and to cut the sleeping pad.
- seam ripper – to remove horizontal seams and separate the insulation from the fabric.
- marker – to trace the shape of the bottom of the bag onto the sleeping pad.
- On the bottom of the bag there should be two layers of fabric (inner and outer). Cut a horizontal line from one side to the other of the inner fabric just above shoulder height.
- Remove the horizontal seams from the bottom of the bag (ONLY the ones that hold the insulation in place).
- Carefully cut the insulation out from between the layers , leaving the bottom 10-12 inches of insulation in place to provide a foot box to keep your feet warmer.
- Place the bag on top of your foam pad.
- Trace the bottom seams of the bag on the foam pad. Make sure it will be snug along the bottom so as not to let air in the pad.
- Cut the foam pad along the lines.
- Slide the pad into the bottom of the bag.
- Weigh the final results and note the size. Oh and post below with how it went!
2.9 lbs, Compressed: 8″x10″ |
A case for backpacking quilts
This one is for all you out there that sleep like a log. A log that doesn’t roll around.
In the pursuit of lightening the pack load and saving my back while carrying my kids’ backpacking gear I’ve been doing a lot of reading on backpacking quilts. They’re lighter and smaller, but just as warm. And here’s why.
Insulation
We’ve all heard talk of loft. We’ve all seen the puffy Michelin man jackets and there’s some logic to it all. A lot in fact. It’s trapped air and loft that prevents your warmth escaping and prevents the cold from entering. The more loft you have, the warmer you stay… in theory.
Think about all that insulation in your roof. You go into your attic or loft and find lots of the stuff lying around. The thicker it is, the less money you spend on heating in winter. They try to sell you more expensive insulation that you need less of because it insulates better. That’s the same thing that happens with sleeping bags.
Your cheap sleeping bags do a good job as they use tons of cheap insulation. They also weigh a ton. Or at least 4 or 5 pounds for a good winter bag. Your expensive bags use less, but higher quality insulation and that saves you weight, allowing for a lot of weight savings. To give you an idea, I have a cheap 40 degree bag that has a list weight of 3.7 lbs. I have a down bag with the same listed temperature that has a weight of 1 lb 6 oz. The down bag is also about a third of the size when uncompressed.
If weight and space is an issue for you parents or you UL backpackers it may be worth forking out a bit more to buy a good down bag. There’ll be less grumbling at a sore back and more time to enjoy the scenery.
How to effectively use insulation
Vaude’s down bag design |
But how can you save more weight? As has been shown, insulation insulates when it has loft. When you lie on it, it looses most of its insulating properties. That means, that all that weight of insulation that you’re lying on is practically useless; especially if you use a sleeping pad that will do that job for you.
That’s why people have been turning to quilts. They save you that weight by not having a zipper or the extra fabric and insulation that you would normally lie on. It allows you to shave off weight and save space for other stuff in your pack.
To give you an example, Golite has been making quilts and sleeping bags for a while now. Comparing their Adrenaline 800+ goose down bag with their Ultralight 800+ goose down quilt shows a significant difference in weight.
Golite ultralight down (800+) quilt – rating 20°F / -7°C Weight: 1 lb. 8 oz.
Golite Adrenaline down (800+) mummy bag – rating 20°F / -7°C Weight: 2 lbs. 3 oz.
By cutting down on materials and insulation, the weight drops over half a pound on an already very light sleeping bag.
Do It Yourself
Making my own sleeping bag scares me. I’m not a stranger to a sewing machine, but making a down quilt seems like a big project. However, converting a sleeping bag into a quilt doesn’t scare me, just my wife. It’s doable. I’m working on a project now that copies the Big Agnes idea of replacing the bottom insulation of a sleeping bag with a sleeping pad. I’ve cut out a couple hundred grams and a bunch of space.
The other benefit, especially for down bags is that you can take all that bottom insulation and put it on the top to make a warm weather bag take you further into the winter season.
If you’re looking to do some DIY, why not check out the following links for some ideas?
Purebound.com’s mummy bag to quilt conversion
Thru-hiker’s down quilt project (for the brave (or bold) seamster/stress
Reader Post: Homemade Marshmallows – a first time for everything!
So one of our friends and followers Rich Kolb mentioned a successful attempt at making Marshmallows on twitter and I was intrigued. He agreed to write about his experience and share how it went. Now that snow is falling around a lot of the USA and Canada, this could be a great family project to prevent cabin fever!
Marshmallows
by Rich Kolb
I was looking for gift ideas for my wife for Christmas. You see, shopping for my wife is rather hard. We’re both rather frugal and we’re pretty well set in what we like. The problem that arises with that is that our wish lists are pretty specific and if one of us is out and about and sees something off that list at a good price it’s not unheard of for us to buy it, hand it to the other one when we get home and say something along the lines of ‘Here, I bought this for you to give me for Christmas.’
So there I was, looking for a gift idea to give my wife, I was hoping to find something handmade and unique. I wasn’t having much luck and then I stumbled upon a random website with gift ideas, and one of them was homemade marshmallows. This worked out great, my wife is a huge smores fan, and they can only get better with homemade marshmallows.
I started searching the internet, and found several recipes, but the one that stuck out the most was this one:
http://www.bhg.com/recipe/candy/homemade-marshmallows/, from Better Homes and Gardens. The BHG New Cook Book has been a staple in my house for as long as I can remember. I found that I had most of the ingredients already, I only had to buy some gelatin and a candy thermometer. I’ve talked to a few people about using a candy thermometer, and a lot of people are intimidated by them, but I found there really is nothing to it.
I read the recipe several times, I always like to have a pretty good idea of what the next step will be. I didn’t follow it exactly, I decided that I would use real egg whites instead of an egg white product. That had more to do with my lack of ability to find anything suitable a week before Christmas then anything else. Plus, I figured we’ve been eating eggs for centuries and we’re all still alive. My only recommendation is that if you use real eggs you separate them into a different bowl to make sure that they’re good before you
contaminate more ingredients.
On to the cooking. I found that it was pretty simple to follow the directions, the only gotcha I had was on step 3, where it said 12-15 minutes total. Either I have a super stove, or they meant that entire step took that long. At least I was keeping a close eye on things and it didn’t cause me any problems. After I had chilled them I used a paring knife to cut them into small pieces. One of the things that I liked was that I could make various sizes, which has been handy for us as we’ve used them in smores, hot chocolate, and just for random
snacking.
All in all, I’m glad I took the risk and made them. My observations have been that homemade marshmallows are much more flavorful than anything I’ve found in the store. They are sweeter than any brands I’ve found, and I’ve decided that I could easily adapt the recipe to make other flavors, like coconut or almond, which is something I hope to try soon. The melt faster, so far we’ve only microwaved them and put them in the over for smores, I expect they’ll melt over a campfire faster than store bought ones too.
If you decide to make something like this yourself I would offer the following tips, read the recipe a few times, it’s nice to not be surprised by things, keep a close eye on what’s on the stove, boiling sugar could turn into a disaster quick, and it’s pretty dang hot, and one thing I’m glad I did first, test fit the thermometer on your pan. With the way it was setup out of the package it wouldn’t have worked and the window I had to get it set was barely long enough. If I hadn’t test fit it I would have ended up getting the thermometer in the pan right when it was due to come off the stove.
—
Richard Kolb II
DIY: 9 gram mini side burner alcohol stove
The bane of many a solo-hiker that buys his snowpeak 600 or 700 is that most alcohol stoves no longer work well with such a small pot! Never fear, you can now save more grams and more money with this DIY… WARNING: It may leave you slightly more caffeinated!
It’s a mini side burner stove made from 2 mini energy drink cans. Hurray, another excuse to buy energy drinks! It’s made out of the narrow energy drink cans and that makes it incredibly light (9 grams) and also really efficient for narrow pots that solo hikers tend to use.
I put together a video with instructions on how to make it and tried to be as thorough as possibly (while frustrating the viewer with a bit of off center, out of focus videography!
Watch the DIY and feel free to leave comments and feedback. I know that a couple times I go off screen, Sorry!
DIY: Winter Projects – Helle Knives
Well it’s winter time and it’s getting dark early. It’s time to retire to the shop/work bench and get busy on those projects that you’ve been wanting to try. In spring I posted an article about working with Helle knife blanks and it’s about time for a follow up.
I always wanted to make a forge and start hammering away at high carbon steel until I could produce my very own knife. Although it is still on my list of to dos, I know that it won’t happen for some time. Never fear, with my limited skills and tools I was able to get a hold of Helle’s high quality blade blanks (just the metal blade and tine) and work away on nice hardwoods and other materials to produce a completed product that while not completely original is still completely unique.
Since that article I’ve completed 3 knives and have a couple more in the works. I thought I’d show what I’ve gotten done with only a power drill and a couple hand tools.
Knife 1: Helle Triple Laminate, stainless steel Harding Blade. A combination of Ecuadorian hardwood that I salvaged from a piece of hardwood flooring, Ecuadorian leather and Ecuadorian Tagua (Vegetable Ivory).
All the pieces prepped for gluing. |
Glued and ready for sanding |
Sanded, oiled with linseed oil and next to the hand stitched sheath that I made. |
Knife 2: Triple Laminate high carbon Helle Tollekniv Blade with Peruvian Olive wood, leather and Tagua.
Sanded, oiled and next to a WIP sheath that I’m making. |
Nice and snug in its sheath. |
Knife 3: Helle Triple Laminate, stainless steel Harding Blade. Oversized handle of Peruvian Olive wood, tagua and leather.
This is a special WIP project that I hope to explain in more detain in the future. |
The work so far is average, but one thing I’m really satisfied with is how the grain travels through each piece of olive wood. Quite beautiful.
So, what do I use?
- 2 ton, 2 part epoxy.
- Helle blade blanks
- Hardwood
- Leather
- Tagua
- Power drill
- Hand saw
- sand paper
- Sanding wheel
- Vice
How do I feel about the Helle blades? The laminated blades make them harder to break, but also mean that the outside is softer and easier to damage by scratching or scraping. The downside of the softer outer shell is that it makes it nigh impossible to spark a ferrocerium rod without using the sharp edge. They hold a very good edge; Enough to shave the hair off my arm, although I try not to make a habit of it. The blades are also thicker. The harding is a good 1/8th of an inch (3 mm) and the Tollekniv is 4mm. I’m happy with them, but am still looking for a solid high carbon blade blank so that I can spark a ferrocerium rod with it, but that is a minor benefit.
DIY stoves: Speed tests
I know this will appeal to a small subsection of my readership, but I’ve been meaning to sit down and do some altitude speed runs of some alcohol stoves (10500 feet up). In the below video I start the stove and immediately put the pot on to boil 2 cups of water. It’s marginally more exciting than watching paint dry so I condensed the speed down so the whole process lasts around 4 minutes or so. The results are surprising.
Anyhow, take a look if you’re into that sort of thing and let me know if you want a tutorial on one of the two stoves that I haven’t shown yet on the blog.
DIY resource: Make your own Snowshoes
Ok, the snow has started falling and the outdoorist in you has probably already started thinking about various modes of winter travel. Because a dogsled team probably is out of your reach and you’re not expecting anyone to buy you what you really want, why not put together a pair of snowshoes? The concept is straightforward although time consuming. It is a great project for cold evenings in the garage (or the kitchen table if the household permits ;)).
The best resource I’ve come across is a reposting of what looks like scouts book articles on the subject. Ben hunt has several different options on his blog to get you going and see what you want.
I won’t be able to complete one of these projects before next year, but I have decided to test the concept by making a scaled down sized pair for a lark. I’ve started soaking and bending 35 cm (1 foot +) pieces of wood in frames and will next start building braces and binding them.
It’s got my kids excited to have their own pair and I can’t wait to take them out on some winter hikes.
If you’re new to winter hiking like I am, stop by Ray Anderson’s blog where he’s started a series of articles on the subject:
Winter Hiking part 1
Winter Hiking part 2
Are you a snowshoer? What’s your favourite part?
<A HREF=”http://ws.amazon.com/widgets/q?rt=tf_cw&ServiceVersion=20070822&MarketPlace=US&ID=V20070822%2FUS%2Fsurvi0d-20%2F8010%2F100f95d6-7cbd-4fc2-9623-471d55a1f549&Operation=NoScript”>Amazon.com Widgets</A>
Other Resources:
Gil Gilpatrick Snowshoe making maestro
Easy PVC Snowshoes
On a budget: The Backpacking Cookset
My first cook setup |