Home / cooking (page 2)

cooking

Trail Cooking: Herby Pasta White Sauce

A week or two ago I posted an article about alcohol stove cooking where I took my family out on a picnic and we cooked with a couple home made alcohol stoves. One of the recipes was a pasta with white sauce. While most pastas have their own cooking rules, I thought I’d post the recipe for the white sauce and instructions on how to prepare the meal with your own favourite pasta.

The benefit of this recipe is that it uses all dry ingredients and can be premixed. As with any trail recipe, try it out before you go to adjust ingredients to your taste.

Herby Pasta White Sauce (serves 2)

Ingredients

  • Pasta for 2

  • 1/4 cup whole milk Powder
  • 1 tbsp Parmigiana (parmesan) Cheese
  • 1/4 tsp dried oregano
  • 1/4 tsp dried basil
  • 1/4 tsp garlic powder

Home Preparation:

  1. Mix dried ingredients and store in air tight container.

Steps:

  1. Boil pasta
  2. Pour off extra water into a container to be used with the sauce.
  3. Pour dry white sauce mix into a cup or other container
  4. Add extra water to the mix, stirring regularly until the sauce reaches the desired consistency.
  5. Pour sauce over pasta.
Tips: Consider adding less herbs if you’re not a fan of basil, oregano or garlic. This sauce also works well with packaged tuna.

Alcohol Stove Cooking – Family Picnic

This Saturday we zipped out of town and up into the foothills of the Condoriri mountain range for a picnic. The 5 of us piled in to the car, drove for a few hours and hiked up to a pretty little waterfall, that sometimes has fish below, and then went to work preparing various backpacking culinary delights. All made from scratch. Scroll down to see a video of the trip and cooking experience.

It was an opportunity to try out some easy and cheap recipes that could make it into our family backpacking trip menus. We didn’t have time to test all of them, but here are three. Instructions and How to video to come.


Herb Potatoes

An improvement on regular mashed potatoes, but we need to fiddle with the ingredients. The kids weren’t huge fans.

Ingredients

  • Plain instant mashed potatoes
  • Milk powder
  • Dried Basil
  • Garlic powder
  • Dried Oregano
Alternatively put dried parsley instead of basil and oregano.
Quinua Pasta with white sauce


This was a big hit and ended up nice and creamy. I waas busy working on recipe 3 and didn’t get more than a bite!
Ingredients
  • Milk Powder
  • Sauce mix
    • Parmesan Cheese
    • Dried Oregano
    • Dried Basil
    • Garlic powder
  • Olive oil
  • Smoke beef or canned tuna
Backpacker’s Chocolate Bundt Cake


I picked up some mini bundt cakes (about 10cm across) from a local store and combined them with a simple no dairy, no egg cake recipe. The results were a simple, but delicious cake that was plenty for 1 adult, or 2 kids. This is definitely a treat for the trail!
Ingredients
  • Cake mix
    • 3/4 cup Flour
    • 1/2 cup sugar
    • 3 Tbsp cocoa powder
    • .5 sp baking soda
    • .25 tsp salt
    • .5 cups water
  • 2.5 tbsp oil
  • oil to grease bundt cake pan
Conclusions
Two out of these three recipes are perfect as is and the potatoes could use some improvement before they make it into the permanent menu. Watch the video and get an idea of how we did it.
Stay tuned as we’ll be showing you a recipe for orange spiced cake that works well in a bundt or can be cooked without in a delicious and fun way.

Why to pack a thermos on your next trip

It’s early morning, you may or may not have slept well and it’s cold… ever so cold. Scratch that. It’s late morning, you slept really well and you’re late to get back in the canoe to continue the trip. wait, wait… Even better, you’re planning to stop for lunch and it’s pouring rain; Your matches are wet and the anticipation of hot soup is killing you. Yah, that’s more like it. You’re hungry, you don’t want to light a fire or fetch water for your stove, but you want something hot, NOW! What do you do?

If you’re interested in a bit of creature comfort, you should probably think about packing a thermos on your next outdoor adventure. Those wonders of vacuum sealing and insulation that have been around for a LONG time and were in Grandad’s lunch kit are often ignored when making up your gear list, but there’s a reason Grandad packed it.

This could be your ticket to an easy morning at camp and relaxation when the rest of the crew are fiddling with stoves and have gone off to fetch a pail of water.


Sunrise on the Choro Trail. I took a Stanley vacuum food container on the trip to make morning meals easier.

As part of a car camping or canoe trip, day hike, car trip or even just to store a hot lunch, the old classic thermos can do a lot to make your day that much more comfortable. You can do all your water boiling at one time and still enjoy more than 1 hot meal per day.


A few months back I was sent a 20 oz Vacuum Food Jar by Stanley I’ve been experimenting with it since then and thinking of different ways to put something like this to use. It’s certainly not Ultralight gear material at 18 oz weight, but as a luxury addition to your canoe or car camping kit it’s a great little piece of gear that holds a wealth of convenience.

My Stanley vacuum food jar ready for the hot water.

Here’s a few tips or uses for your thermos. While making dinner, boil a couple extra cups and pour them into your thermos for the next morning.  You won’t have to worry about getting water or fiddling with your stove or camp fire in the morning. You can even pack up camp the night before and be ready to go early for that extra 15 minutes of fishing! If the night gets really cold, you’re set for a cup of hot chocolate to warm you up for those extra couple hours until morning! 


For all those DIY cookers and bulk buyers, you can save on waste and disposable junk by using your thermos to rehydrate your meals. Even better, you save on fuel as you just have to boil your water, pour your meal into the thermos, seal it and let it finish cooking there! 

Here are some of the features of my Stanley Vacuum Food Jar:

  • Keeps hot/cold 12 hours. 
  • Wide-mouth opening. 
  • Protective double-wall construction. 
  • Stainless steel. 
  • Rustproof finish. 
  • BPA free
  • Lifetime warranty.
In my experience, the 12 hour rating would be for a full container and probably at about sea level. When I tried it at altitude using 1/4 capacity (10000 feet where water boils at a lower temperature) it had cooled down significantly when I opened it after 12/13 hours. An 8 hour storage time would be a safe bet for keeping your food hot. At 9-10 hours it will be warm, not boiling hot.
The capacity is a big plus on this one. 20 oz is a great size for 2 hungry outdoors adventurers. The wide mouth top is one of my favorite features. I’ve been turned off thermoses in the past by how hard they are to clean out, but Stanley has certainly applied their years of experience to this one.
The Stainless steel also means that there’s no bad taste in the food, no matter how many hours it sits for. 
To top it all off, in the lid there’s a nice foldable spoon. Although it looks a bit short for the depth of the jar, the wide mouth means that you’re not likely to get goop on your hand when you’re digging out the last of your oatmeal or stew.
If you haven’t thought about taking a thermos on the trail or in your canoe, you should definitely look into the options out there and think about the convenience factor of not having to pull your stove out all the time when you need a bit of hot water.
Do you have a Stanley or thermos story or maybe another tip for those who are new to thermoses? We’d love for you to leave a comment below!

Fun Facts: The origin of freeze drying

Freeze drying or lyophilization now-a-days goes hand in hand with space flight, military and backpackers. We think of modern technology for lightweight and long term storage, but it’s something that has been around for a lot longer than even the USA was a nation.

This technology in its primitive form is both pre-columbian and pre-incan and was used by the aymaran cultures of South America for over 600 years.


Freeze drying preserves food by removing moisture  by using a combination of freezeingcold temperatures and heat. The Andean cultures have taken advantage of the cold nights in the mountains and the intense sun to do the same and preserve potatoes to make them last for years. 

The process takes several days and is usually done in their winters at high altitude, even today. They head up to the hills and lay out the potatoes on the hard ground. After poking holes in the potatoes to help the moisture escape they let the cold temperature bring the moisture out to the surface and then let the sun let it evaporate. They then employ the most basic of tools, their feet, to help remove remaining moisture and at the same time get rid of the skins. Depending on the type of potato product they want, they can moisten them to produce a white potato (tunto) as opposed to the normal black variety (chuño). The final process is to let them finish drying without skins in the sun.

They then can be stored for long periods of time (some were even found at the pre-incan ruins in Bolivia known as Tiwanaku).

To me, it shows how people of different countries learned to adapt and make use of their environment, and how some of these “New” ideas are actually only slight variations of well proven concepts.

I’ve had the opportunity to both see the process in action in the Andean mountains and taste the rehydrated end result. It’s amazing to see small communities of tents on high mountain passes set up for the drying season and the hillsides covered with potatoes for those few weeks of the year.


They include these potatoes in many traditional dishes and soups. I’ve also had the opportunity to taste them. The locals love them, but let’s just say there has been a lot of progress made with freeze dried meals in the last 50 years in North America.

You can’t help but admire their ingenuity in developing such a simple and effective way to preserve food with little cost. Especially when the modern day equivalent requires a machine that costs tens of thousands of dollars!

Axe deoderant backpacking alcohol stove

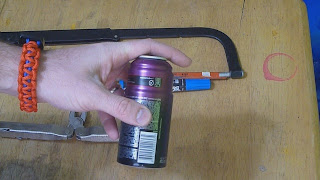
I was staring at an empty AXE deodorant container and wondering what to do with it. Will it be a mug? No, I don’t like drinking from boiling hot aluminum cups. What else can it be? a stove.  My apologies to all of my readers who have seen too many articles on stove making. It’s probably a mix of my fire-loving, DIY doing and recycle-mindedness that motivates me. Oh… and you can throw in a bit of money saving as well.

I don’t recommend you go out and by something just to make a stove, but we all have habits and customs and at the end of the week/month we have empty aluminum and metal cans that we can recycle. If you use AXE deodorant this could be for you. The graduated diameter of the can makes it perfect for a double walled stove.

What you’ll need:


  • Hack-saw or other metal cutting blade,
  • permanent marker for marking cut and drill lines,
  • 3 books to use to mark lines around the diameter,
  • Drill and small drill bit (better of smaller than 1/8th”)
  • pliers
  • sand paper or file to smooth out cuts and drill holes.

Steps:

  1. Discharge all remaining propellant from the can.
  2. Remove the top seal with pliers.
  3. Mark a line, all around the diameter at 6.5 cm form the bottom.
  4. Using the hack-saw, saw 90% through the surface of the can, rotating the can as you go.
  5. Finish cutting through the can with hack saw
    1. Once you get half way through the can, it should be possible to “open” the can by applying pressure to the seam.
  6. About 1 cm from the top of the bottom half, draw another line around the diameter.
  7. Spaced about 1.5 cm apart, draw marks along the line made in step 6.
  8. Drill through the outer can at the marked spots along the line.
  9. Clean up the cuts and drill marks using a file or sand paper.
  10. Invert the top half of the can and place it inside the bottom half.
  11. On a flat surface, press the two cans together until they slide into each otherand a seal is formed.
  12. Lock and load!
Here’s a video showing how to do this:

Reader Post: Homemade Marshmallows – a first time for everything!

So one of our friends and followers Rich Kolb mentioned a successful attempt at making Marshmallows on twitter and I was intrigued. He agreed to write about his experience and share how it went. Now that snow is falling around a lot of the USA and Canada, this could be a great family project to prevent cabin fever!

Marshmallows
by Rich Kolb


I was looking for gift ideas for my wife for Christmas. You see, shopping for my wife is rather hard. We’re both rather frugal and we’re pretty well set in what we like. The problem that arises with that is that our wish lists are pretty specific and if one of us is out and about and sees something off that list at a good price it’s not unheard of for us to buy it, hand it to the other one when we get home and say something along the lines of ‘Here, I bought this for you to give me for Christmas.’

So there I was, looking for a gift idea to give my wife, I was hoping to find something handmade and unique. I wasn’t having much luck and then I stumbled upon a random website with gift ideas, and one of them was homemade marshmallows. This worked out great, my wife is a huge smores fan, and they can only get better with homemade marshmallows.

I started searching the internet, and found several recipes, but the one that stuck out the most was this one:
http://www.bhg.com/recipe/candy/homemade-marshmallows/, from Better Homes and Gardens. The BHG New Cook Book has been a staple in my house for as long as I can remember. I found that I had most of the ingredients already, I only had to buy some gelatin and a candy thermometer. I’ve talked to a few people about using a candy thermometer, and a lot of people are intimidated by them, but I found there really is nothing to it.

I read the recipe several times, I always like to have a pretty good idea of what the next step will be. I didn’t follow it exactly, I decided that I would use real egg whites instead of an egg white product. That had more to do with my lack of ability to find anything suitable a week before Christmas then anything else. Plus, I figured we’ve been eating eggs for centuries and we’re all still alive. My only recommendation is that if you use real eggs you separate them into a different bowl to make sure that they’re good before you
contaminate more ingredients.

On to the cooking. I found that it was pretty simple to follow the directions, the only gotcha I had was on step 3, where it said 12-15 minutes total. Either I have a super stove, or they meant that entire step took that long. At least I was keeping a close eye on things and it didn’t cause me any problems. After I had chilled them I used a paring knife to cut them into small pieces. One of the things that I liked was that I could make various sizes, which has been handy for us as we’ve used them in smores, hot chocolate, and just for random
snacking.

All in all, I’m glad I took the risk and made them. My observations have been that homemade marshmallows are much more flavorful than anything I’ve found in the store. They are sweeter than any brands I’ve found, and I’ve decided that I could easily adapt the recipe to make other flavors, like coconut or almond, which is something I hope to try soon. The melt faster, so far we’ve only microwaved them and put them in the over for smores, I expect they’ll melt over a campfire faster than store bought ones too.

If you decide to make something like this yourself I would offer the following tips, read the recipe a few times, it’s nice to not be surprised by things, keep a close eye on what’s on the stove, boiling sugar could turn into a disaster quick, and it’s pretty dang hot, and one thing I’m glad I did first, test fit the thermometer on your pan. With the way it was setup out of the package it wouldn’t have worked and the window I had to get it set was barely long enough. If I hadn’t test fit it I would have ended up getting the thermometer in the pan right when it was due to come off the stove.


Richard Kolb II

New Years Smoked Pig

Well, this year we wanted to do something special and have a few friends over for New Years and after a week of prep my wife decided on a sucking pig roasted in the oven with the trimmings. Things were going off well, but when she went out to buy the pig they were sold out. It could have been that she asked for a lechero (milk man) to roast and not a lechon (suckling piglet).

Oh well, she found one eventually, but when she got it home it turned out that it was too big for the oven so I put my own plan into action. I’d been hoping to smoke said pig in our barbecue and this was my chance! I could get my way and be the savior of the party as well. So here’s the run up. I originally planned on doing a video and got half way through until an event that will be described later. I looked at a few websites and ideas and ended up following the advice of Ray Mears.

The Prep

So the day before I took a coarse salt and coated the pig evenly inside and out. This was done with a patting action as rubbing it just made it all fall off. Then I put it in the fridge in a bag over night. I cleaned everything really well (including myself) as you have to be very careful with raw pork.

The next job was to adapt my bbq, which is an open grill in a brick house. It already has a crank to lift the grill up and down and so I drilled several holes, six inches apart, in the shaft of the crank in preparation to wire it on with non-galvanized wire.

The next morning, I woke up early and faced the less than pleasant task of taking out the pig and strapping it to the rotisserie. The skin was thick and it took a bit of work to get the wire through (especially as my 7am pre-coffee self!). By cutting with my knife I was able to get it done. The wire was tightly bound and I bound the pig’s legs together to keep him in place. They said that sometimes the legs fall off while cooking (presumably at the shoulder), but I haven’t had that experience.

Once imprisoned on his skewer I set to scoring the skin with my knife in a crisscross style so that I had a diamond pattern. I could have scored it a bit deeper in places, but it did the job.

I’ve smoked stuff in various ways, using wooden boxes, etc, but this time I got some heavy duty aluminum foil and put it across the front of the BBQ and locked it in place with wire and some tape. I find that while smoking there’s no problem if you get packing tape on while the bricks are cool. It doesn’t affect the cooking at all or the taste as the heat is coming out, not in.

Next was the roasting.

The Smoking


After setting up the tin foil I started the fire. It was a mix of natural charcoal and wood. Although it is a bit harder to manage with the wood, I find the flavor mix is excellent. I kept it burning low, adding water to the coals whenever it flared up. Every 15-20 minutes I gave the pig a quarter turn, listening to the spatter of fat that dripped down, basting the meat as it went.

This went on for several hours until on turning the crank on one occasion the crank slipped off the shaft and became loose. It was quite the challenge for the rest of the day, but we managed.

Things became complicated when the car broke down on the way to pick up people for the evening. It broke down in the middle of a main road full of traffic in the rain. The alternator had gone on the fritz and I had to get a friend to help me take out the battery and take it home to charge.

I managed to get back in time to baste the pig with honey and then turn up the heat for the final roast.

The Roast

My plan was to do a full roast for the last hour or so to finish it off and get the crackling all ready. It was working great until I went to remove it.

By then, the fire was roaring and it was a challenge to get close, let alone work with the pig to get it off. I decided to take off the foil and place it over the coals to tone it down. This worked for about 5 seconds until I touched the pig and the fat poured off, onto the tinfoil and then flash ignited. Welcome the 4 foot flames.

I took the burning tinfoil away and this just compounded the problem. I managed to get the pig off and onto the grill itself which gave it an unneeded scorching (for effect you know). At this point I remembered the water and doused the coals (not the pig) and we pulled off pieces of the pig and placed them on a platter.

It was this series of events that made me forget to take a video.

The Eating

I’ll definitely be doing this again. The pork was succulent and smokey. It was the perfect compliment to the rest of the meal prepared by my wife. Several ours later I fell into a pork induced coma and slept peacefully despite the fireworks, drunken singing and early morning sounds of people staggering home through the streets.

The evening went off without a hitch and had the added benefit of me getting the car back home late that night in a town full of drunken revelry.  It hadn’t even been broken in to!

So now it’s your turn. What did you do and what great foods did you sample or make! Better yet, what memorable mistakes were made?

On a budget: Revisited a $3, 2 cup coffee maker

A week or two ago I posted an article about the backpacking cookset on a budget where I mentioned some cheap cooking pots. I just wanted to show one of them in this post / video and how these cheap options don’t mean a sacrifice of creature comforts.

In Bolivia I picked up a 2 cup teapot with coffee maker attachment that weighs under 4 oz. Take a look at the following video to see the setup and a boil test with my fastest stove from the previous post’s video comparison.

If there is interest, I’ll look into getting a few more, but it could take a while.

How to make Biltong (South African Beef Jerky)

My Wife’s family is from South Africa and always had fond memories of Biltong. Biltong is a thicker, moister beef jerky with a secret ingredient: Coriander. It provides a nice change from beef jerky, it’s home made so it doesn’t have chemicals and preservatives and in my opinion it tastes far better. The only problem is having to share it on the trail!

Here’s the recipe that we use in our house and a video “how to” too.

DISCLAIMER: In our house my wife has to make two batches before a backpacking trip. 1 batch a week before as a distraction and then another one 3 days before to make up for the batch I’m finishing off :).

Biltong recipe

This recipe calls for the beef to be marinaded overnight.

Ingredients:
1 kg boneless beef roast
apple cider vinegar (about 1/4 cup or so, plus a bowlful for rinsing in step 5)
worchestshire sauce (about 1/4 cup or so)
1 Tblsp. rock salt
1/4 cup brown sugar
1/2 tsp. pepper
1/2 baking soda (to soften meat fibers)
coriander, roasted, ground (if can’t find roasted, plain ground coriander is ok – but not as flavorful. A coffee or spice grinder will grind roasted whole coriander – roasting them yourself is easy – 350 F on an ungreased cookie tray until aromatic – about 3 to 6 minutes)
  1. Partially thaw meat until able to slice with very sharp knife – should still be quite frosted. This ensures clean, neat, uniform thickness slices. If you slice with the grain, the biltong will be chewier, if you slice against the grain, it will be easier to tear. Slice into 1/4 to 1/2 cm. thick slices. Cut slices into any size you want. Trim off excess fat – too much fat, and the biltong will go rancid more quickly.
  2. Mix rock salt, brown sugar, pepper, soda.
  3. Marinade meat in large baking pan (13 by 9 inch). On the bottom of the pan, sprinkle a little salt mixture. Lay on a single layer of meat, sprinkle with salt mixture, then vinegar and worcheshire sauce. You want just enough salt mixture and vinegar and worcheshire to get the salt mixture to fizz. Not too much! Not too little! Repeat layers, ending with the salt-vinegar-worcheshire on top. You want to layer it so that by the end, you’ve run out of the salt mixture. It’ll take practice! 
  4. Marinade 12 hours in the fridge. Not much longer than that – if you marinade too long, the meat dries out too much. If you marinade too little, the meat has not cured enough and will be flavourless and will spoil faster.
  5. Quickly dip each piece of meat in a bowl of apple cider vinegar to get off excess salt – not all the salt, just the excess salt. Lay in dehydrator in single layers – no overlapping. Sprinkle with coriander. Dehydrate about 4 hours – the meat should be pliable but not gooshy and definitely not dry. If it’s gone stiff and hard while still warm, it’s dried too much. Once the pieces have cooled, they should be fairly stiff but still at least a little flexible. I always eat a piece or two to test. 🙂
  6. Store in ziplock bags with a paper towel to absorb condensation in fridge or freezer – if you freeze for a long time, it tends to dry out a bit more. You don’t want the biltong to get warm and humid, as it will spoil very quickly.
I recommend you do a small batch (about 1 kg meat) to start, to get the feel of things and to adjust things to get the taste and texture you want. When I do a big batch, I sometimes do as much as 6 to 8 kg at once. 1 kg of fresh meat doesn’t make a lot of biltong! (Probably only about one small freezer bag worth). You don’t want to do too much at once, because then it doesn’t all fit on the dehydrator at once and the rest of the meat marinades too long and becomes too dry.

My sister-in-law added this piece of advice:

“One note, I actually take my meat to the butcher and ask them to slice it in to 1/2 inch slices so that I don’t need to freeze it and slice it. It makes it a whole lot easier for uniformity in the dehydrator. I just take the slices and make them into smaller strips. Super easy, and easier when short on time.”

Primitive Skills: how to cook food on a rock

I keep going to outdoors stores looking for a nice frying pan. I come up with the same problem, they’re too small or they’re big and too heavy to justify for that one fish you might catch. Every now and then I find on the internet a frying pan of reasonable weight, but they carry a price tag that I don’t want to pay. Tinfoil is reliable, but you need to pack out waste. Again I’ve taken a lesson from times gone by: cooking with a rock.

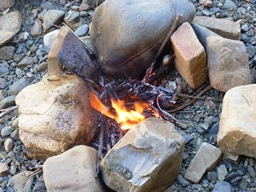
Yup, with a small fire and a nice slab of rock you can fry up a whole variety of food. Some of the tastiest pizzas are cooked on a hot stone and it is now a novelty to roast steak and seafood over a cooking stone. They’re just reinventions of an old concept that predated the cast iron frying pan.
It’s simple in concept but you have to be careful. You really need to watch out for rocks that have moisture in them. Just like in a campfire, a river stone or shale that hasn’t been dried carefully the heat from the fire can cause the moisture to vaporize and in turn cause the rock to explode. ¿Flying fish anyone?
Create two stable piles of stones and place the large cooking slab across them like a bridge. Next, start your fire and when you have a good coal base, move the coals under the bridge. Keep adding small wood to the fire as needed. It will take a while to heat up the stone to make it hot enough to cook on. If you heat it too fast it can shatter. Once the stone is heated, you can add food to your new cave-man frying pan and enjoy a fun, tasty dinner.
One of my favourite benefits of using a stone is that it cooks evenly, unlike the thin frying pans that are built for backpackers. Take a look at the following video to see this technique used to cook a tasty trout!
If you missed the post on how to fillet trout, take a look at this post.

Gear Review: Swiss Ranger Military Surplus stove

A look at the funky looking swiss ranger solid fuel stove. It is military quality (and weight). Coming in at 14 oz for a windshield, canteen and 2 cup aluminum cup for about $10, this little unit is a cheap way to get into backpacking.

It isn’t slow, it isn’t fast. It isn’t light and it isn’t heavy. It is cheap. All in all, it is a middle of the line entry level stove to start you off hiking.

Take a look at the demo video below and if you want to buy one, try Cheaper than dirt. Wish I made a commission selling it 🙂

How to fillet a trout without a knife and cook it without a frying pan

The Native Americans weren’t the typical wasters that the disposable society of today has created. They knew easy efficient ways of harvesting, preparing and cooking wild foods. A good example of this is how some groups used to fillet and cook trout. It’s a really simple technique that doesn’t rely on tinfoil or a cooking pot. You end up with more meat than a typical fillet and no bones… None at all.

Take a look at this video (excuse the background noise and laugh with the kids) of us preparing a trout and roasting it over a fire with sticks. Sorry we couldn’t save some for you!

Is this to complicated? Would you like to cook food on a rock? Take a look at this link